L2 L3: 操作系统启动知识点
本文共 6702 字,大约阅读时间需要 22 分钟。
开机过程中干了什么?
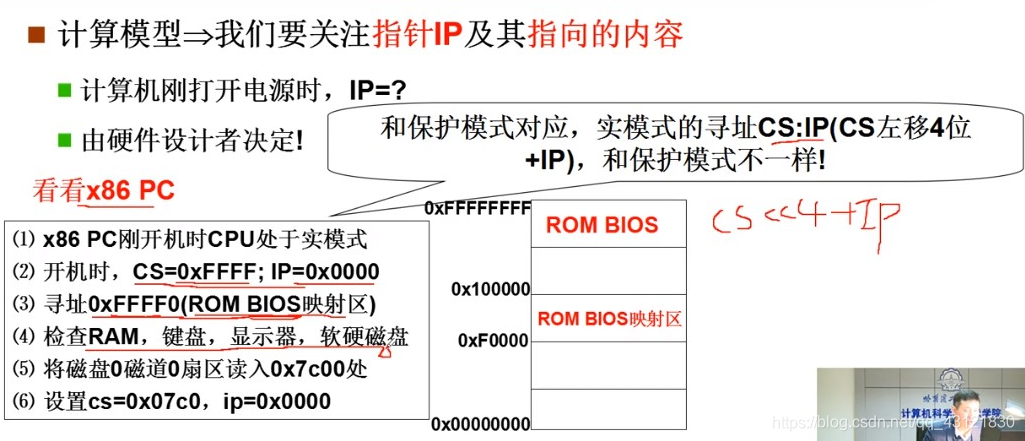
boot_sect -> set up -> system
bootsect.s的工作
先看看代码:可能看不懂,可以直接根据下面解释来看重点!
!! SYS_SIZE is the number of clicks (16 bytes) to be loaded.! 0x3000 is 0x30000 bytes = 196kB, more than enough for current! versions of linux!SYSSIZE = 0x3000!! bootsect.s (C) 1991 Linus Torvalds!! bootsect.s is loaded at 0x7c00 by the bios-startup routines, and moves! iself out of the way to address 0x90000, and jumps there.!! It then loads 'setup' directly after itself (0x90200), and the system! at 0x10000, using BIOS interrupts. !! NOTE! currently system is at most 8*65536 bytes long. This should be no! problem, even in the future. I want to keep it simple. This 512 kB! kernel size should be enough, especially as this doesn't contain the! buffer cache as in minix!! The loader has been made as simple as possible, and continuos! read errors will result in a unbreakable loop. Reboot by hand. It! loads pretty fast by getting whole sectors at a time whenever possible..globl begtext, begdata, begbss, endtext, enddata, endbss.textbegtext:.databegdata:.bssbegbss:.textSETUPLEN = 4 ! nr of setup-sectorsBOOTSEG = 0x07c0 ! original address of boot-sectorINITSEG = 0x9000 ! we move boot here - out of the waySETUPSEG = 0x9020 ! setup starts hereSYSSEG = 0x1000 ! system loaded at 0x10000 (65536).ENDSEG = SYSSEG + SYSSIZE ! where to stop loading! ROOT_DEV: 0x000 - same type of floppy as boot.! 0x301 - first partition on first drive etcROOT_DEV = 0x306entry _start_start: mov ax,#BOOTSEG mov ds,ax mov ax,#INITSEG mov es,ax mov cx,#256 sub si,si sub di,di rep movw jmpi go,INITSEGgo: mov ax,cs mov ds,ax mov es,ax! put stack at 0x9ff00. mov ss,ax mov sp,#0xFF00 ! arbitrary value >>512! load the setup-sectors directly after the bootblock.! Note that 'es' is already set up.load_setup: mov dx,#0x0000 ! drive 0, head 0 mov cx,#0x0002 ! sector 2, track 0 mov bx,#0x0200 ! address = 512, in INITSEG mov ax,#0x0200+SETUPLEN ! service 2, nr of sectors int 0x13 ! read it jnc ok_load_setup ! ok - continue mov dx,#0x0000 mov ax,#0x0000 ! reset the diskette int 0x13 j load_setupok_load_setup:! Get disk drive parameters, specifically nr of sectors/track mov dl,#0x00 mov ax,#0x0800 ! AH=8 is get drive parameters int 0x13 mov ch,#0x00 seg cs mov sectors,cx mov ax,#INITSEG mov es,ax! Print some inane message mov ah,#0x03 ! read cursor pos xor bh,bh int 0x10 mov cx,#21 mov bx,#0x0007 ! page 0, attribute 7 (normal) mov bp,#msg1 mov ax,#0x1301 ! write string, move cursor int 0x10! ok, we've written the message, nowinf_loop: jmp inf_loop! we want to load the system (at 0x10000) mov ax,#SYSSEG mov es,ax ! segment of 0x010000 call read_it call kill_motor! After that we check which root-device to use. If the device is! defined (!= 0), nothing is done and the given device is used.! Otherwise, either /dev/PS0 (2,28) or /dev/at0 (2,8), depending! on the number of sectors that the BIOS reports currently. seg cs mov ax,root_dev cmp ax,#0 jne root_defined seg cs mov bx,sectors mov ax,#0x0208 ! /dev/ps0 - 1.2Mb cmp bx,#15 je root_defined mov ax,#0x021c ! /dev/PS0 - 1.44Mb cmp bx,#18 je root_definedundef_root: jmp undef_rootroot_defined: seg cs mov root_dev,ax! after that (everyting loaded), we jump to! the setup-routine loaded directly after! the bootblock: jmpi 0,SETUPSEG! This routine loads the system at address 0x10000, making sure! no 64kB boundaries are crossed. We try to load it as fast as! possible, loading whole tracks whenever we can.!! in: es - starting address segment (normally 0x1000)!sread: .word 1+SETUPLEN ! sectors read of current trackhead: .word 0 ! current headtrack: .word 0 ! current trackread_it: mov ax,es test ax,#0x0fffdie: jne die ! es must be at 64kB boundary xor bx,bx ! bx is starting address within segmentrp_read: mov ax,es cmp ax,#ENDSEG ! have we loaded all yet? jb ok1_read retok1_read: seg cs mov ax,sectors sub ax,sread mov cx,ax shl cx,#9 add cx,bx jnc ok2_read je ok2_read xor ax,ax sub ax,bx shr ax,#9ok2_read: call read_track mov cx,ax add ax,sread seg cs cmp ax,sectors jne ok3_read mov ax,#1 sub ax,head jne ok4_read inc trackok4_read: mov head,ax xor ax,axok3_read: mov sread,ax shl cx,#9 add bx,cx jnc rp_read mov ax,es add ax,#0x1000 mov es,ax xor bx,bx jmp rp_readread_track: push ax push bx push cx push dx mov dx,track mov cx,sread inc cx mov ch,dl mov dx,head mov dh,dl mov dl,#0 and dx,#0x0100 mov ah,#2 int 0x13 jc bad_rt pop dx pop cx pop bx pop ax retbad_rt: mov ax,#0 mov dx,#0 int 0x13 pop dx pop cx pop bx pop ax jmp read_track!/*! * This procedure turns off the floppy drive motor, so! * that we enter the kernel in a known state, and! * don't have to worry about it later.! */kill_motor: push dx mov dx,#0x3f2 mov al,#0 outb pop dx retsectors: .word 0msg1: .byte 13,10 .ascii "Hello my JYOS !" .byte 13,10,13,10.org 508root_dev: .word ROOT_DEVboot_flag: .word 0xAA55.textendtext:.dataenddata:.bssendbss:
下图是引导扇区的代码,其
先将0x070c:0x0000处的代码,移动到0x9000:0x0000 处 再跳转到go;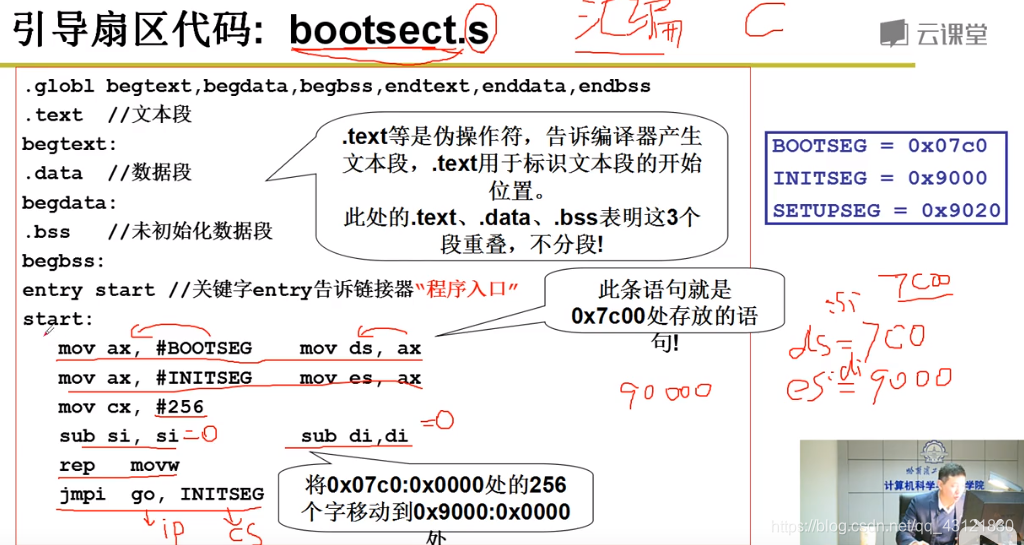
 读入setup后,在屏幕上打印字符串;使用的是mov bp,msg1 mov ax, #1301 int 0x10 利用0x10中断完成显示(并未运行setup!当前指针并未到9020;当前OK_load_setup最后会先读入system模块,再跳转到执行setup.s如下图所示) 如果想要修改这个字符串:1. 修改msg1 2.修改对应字符串的大小:cx,#24中的24是字符串的长度;
 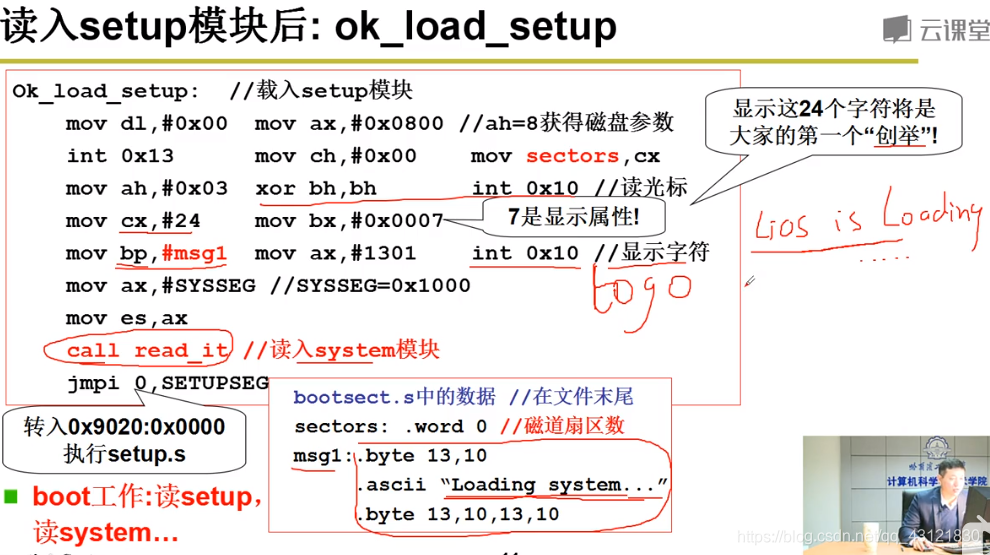 下图为read_it中读入system模块的操作;完成后利用jmpi 给ip和cs赋值,完成跳转到setup,完成bootset;
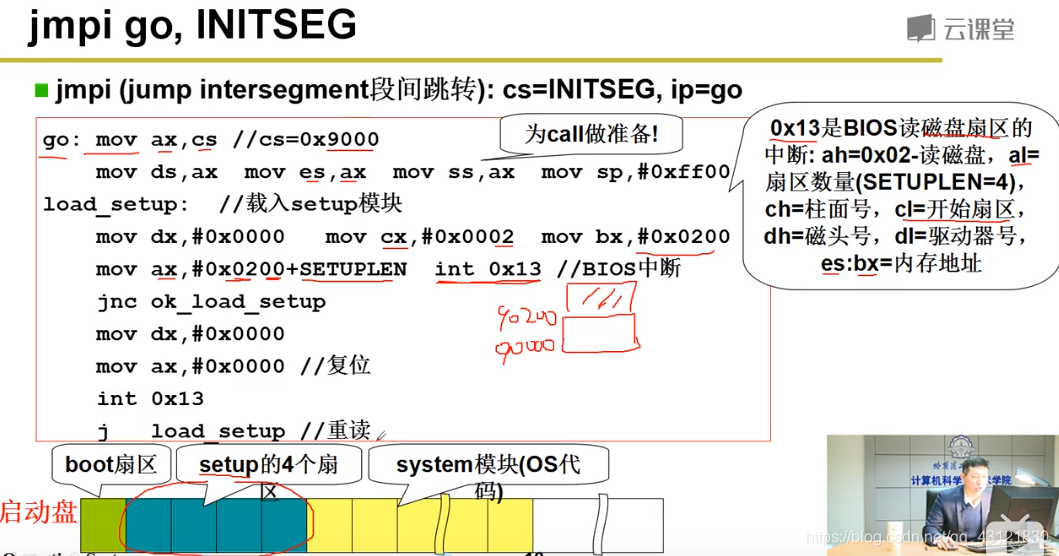
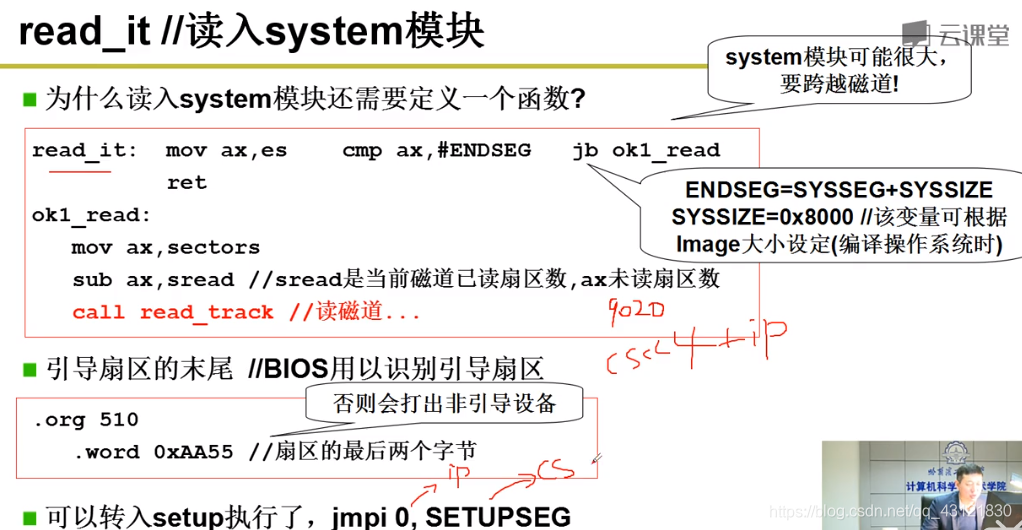
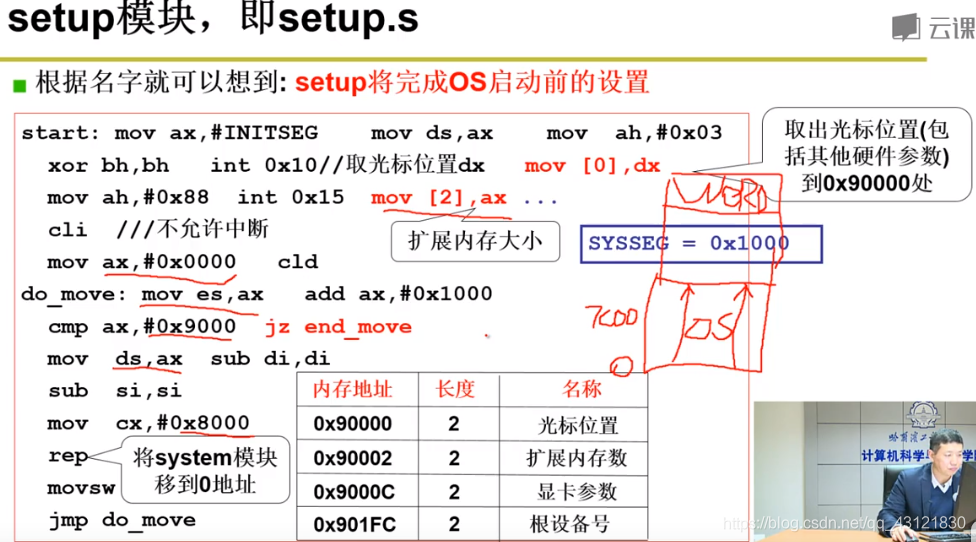
setup.s的工作:
读取物理内存大小,并记录,将 system模块移动到0地址处;
 在setup的最后,需要完成2件事: 1. 切换寻址模式、 2.跳转到0x0处开始执行system模块的代码;
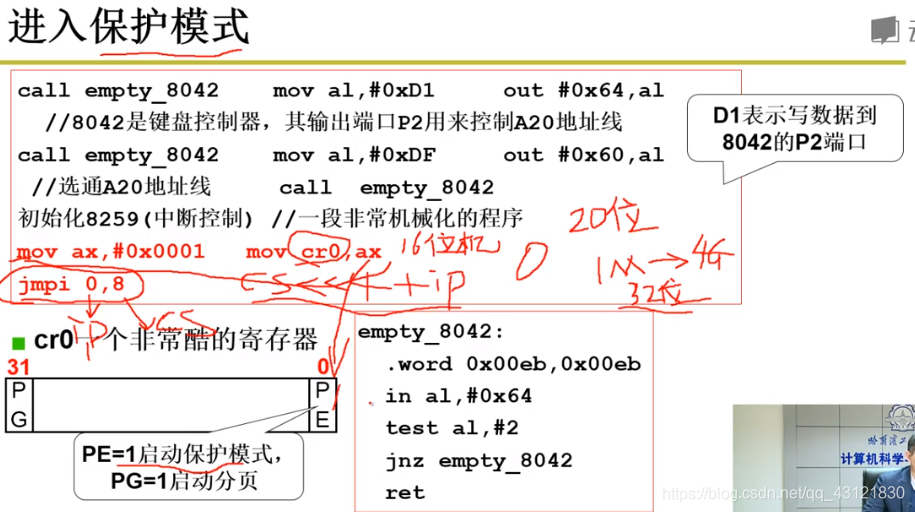
 对于切换寻址模式:16-》32 因为在当前情况下使用的寻址模式是(如下图)cs << 4 + ip:其中cs是一个16位寄存器,其 <<4最多拥有20位地址,也就是1MB的内存大小; 这太小了,如今的计算机至少是4G的,因此需要切换寻址模式,不能使用 cs << 4 + ip;
切换的方法就是:下图中红色代码:使用cr0寄存器改变电路(修改末尾PE从 0—》1),从当前的 实模式 --》》》保护模式
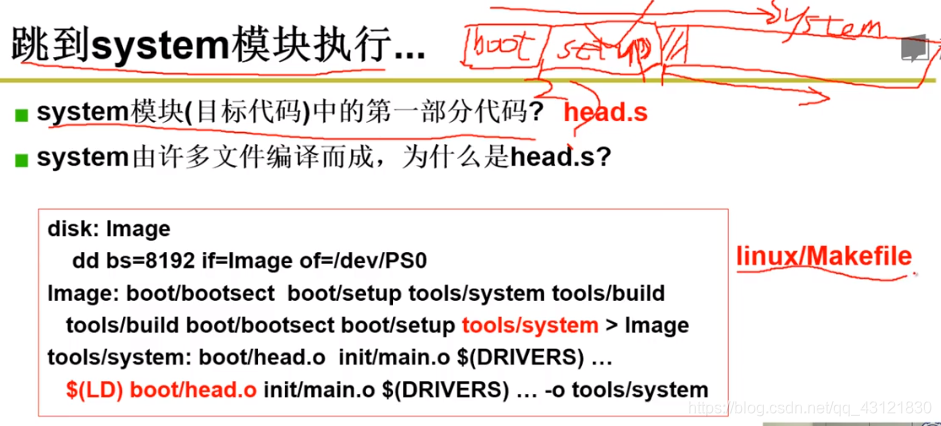
system.s的工作:
system模块相比于前面的bootsect 和 setup来说,要大得多!因为这是 真正用来校验的代码;
他是由一堆文件编译出来的;- 操作系统要想正常启动,前面的代码运行顺序是要严格控制的,像上面说的那样,1. bootsect.s 2. setup.s 3.system.s; system.s是通过makefile来指定使用哪些文件进行编译的;
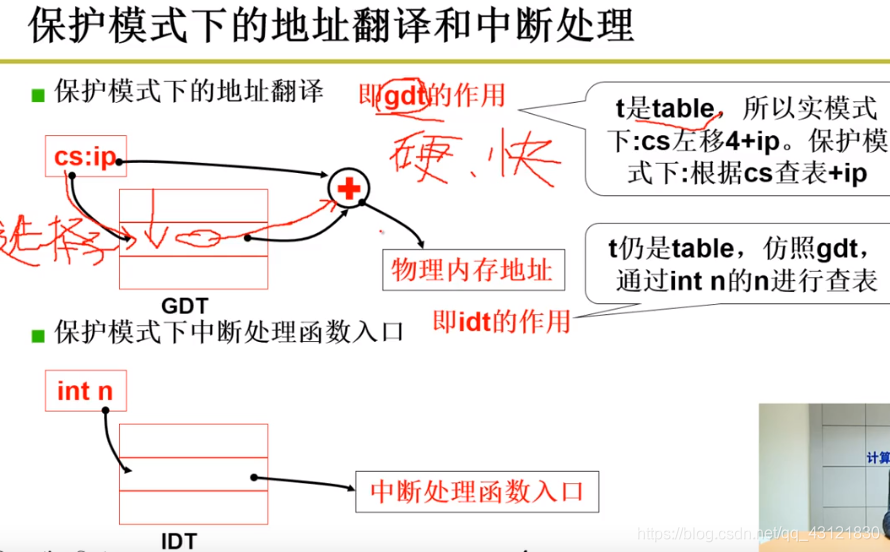
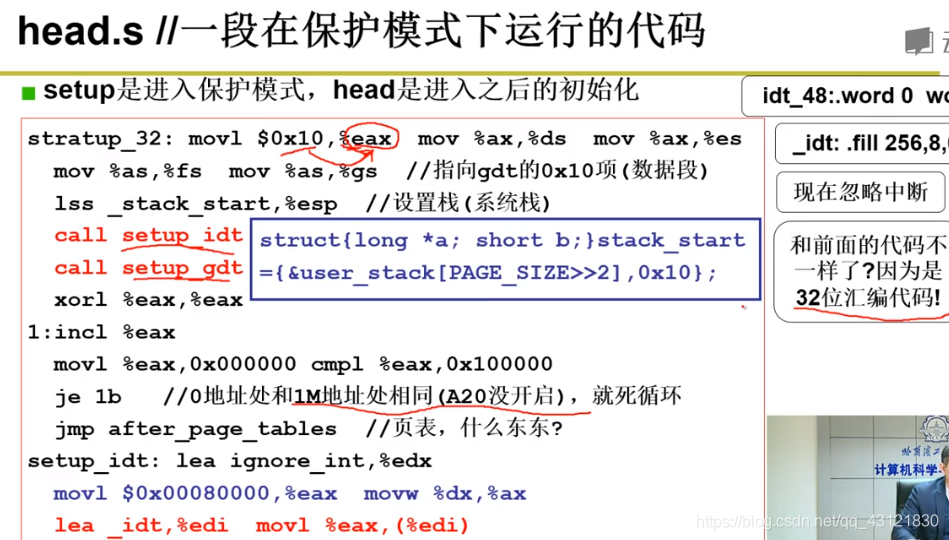
- 在head.s中做了啥?(没仔细看) 重点:做了很多事,包括对于 gdt 和idt的设置;对于系统栈的设置等等;
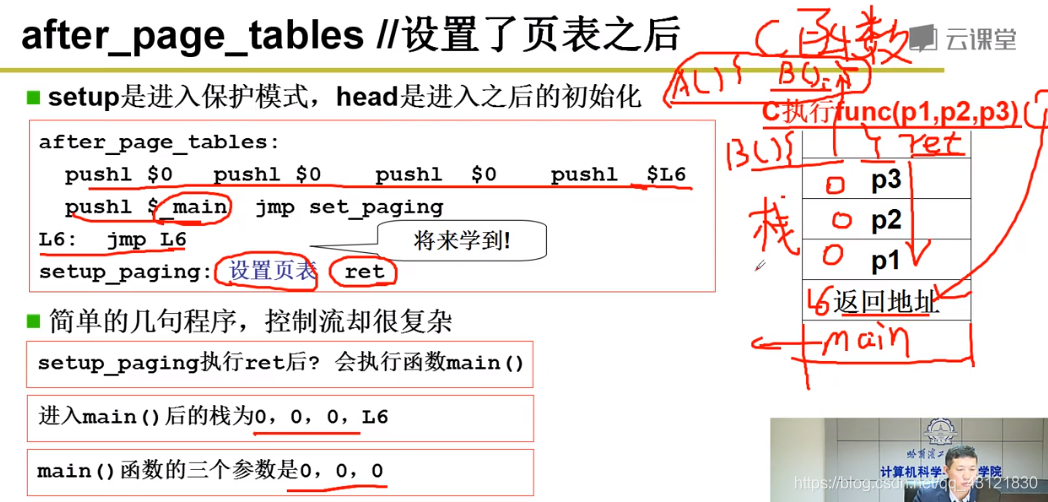
- 上面跳转到了after_page_tables,这里干了什么呢? 首先push了一堆,入栈;接着 跳转到 setup_page 进行页表设置; 最后将栈顶出栈也就main函数出栈,开始执行main函数;当main 执行完成 就到了L6中,也就是死循环了;操作系统的main函数不会结束~一直执行;
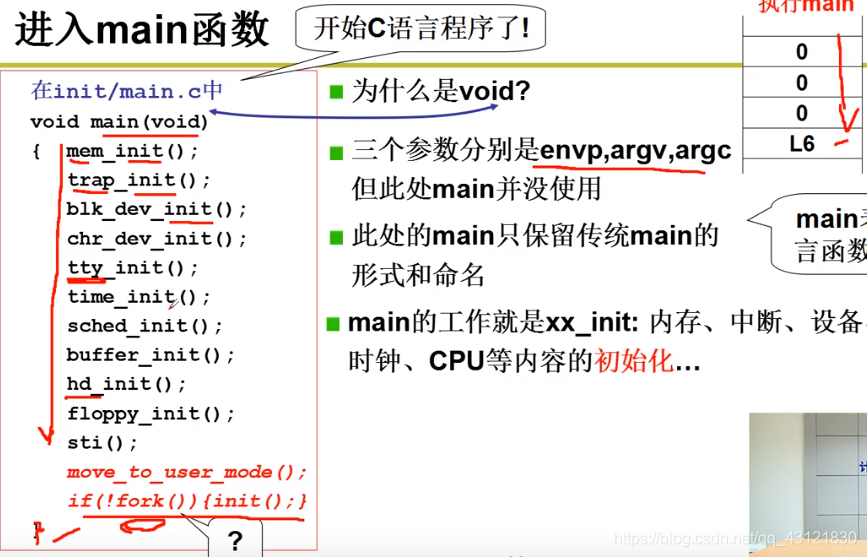
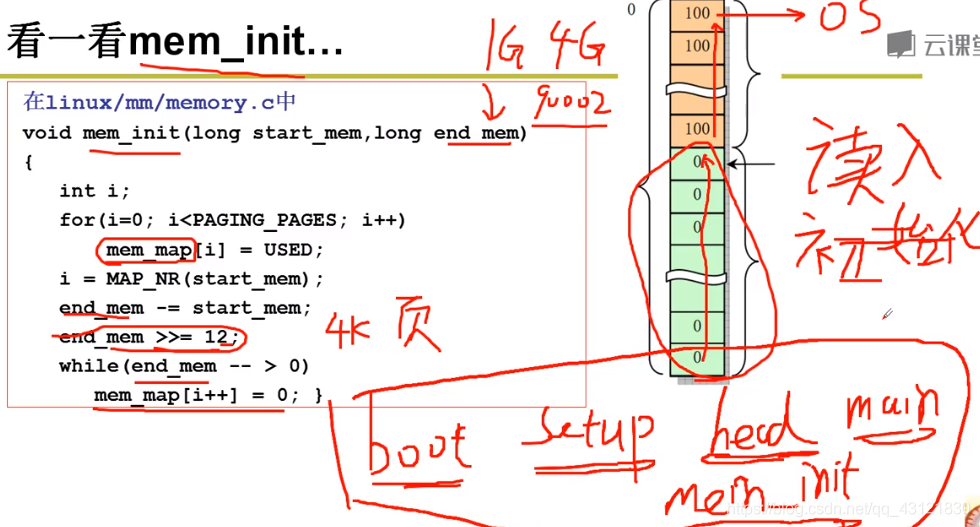
- main函数中做了什么? 进行了一堆初始化工作,我们以mem_init内存初始化来看一下~;
 可以说是终于看到了一些比较熟悉的东西了,这段代码是什么? 这就是内存管理中的页式管理!页表的初始化,根据之前在setup.s中保存在0x90002中的本机内存大小,配合我们期望的操作系统内存分页大小(这里是 >> 12右移12位也就是将 总的地址数 / 每页的地址数 = 2^32 / 2^12 = 220),也就是分成220个页表;下面while中对每个页表进行初始化为0 ,但是前面不需要初始化,前面是操作系统用到的;
entry _start_start: mov ah,#0x03 xor bh,bh int 0x10 mov cx,#36 mov bx,#0x0007 mov bp,#msg1 mov ax,#0x07c0 mov es,ax mov ax,#0x1301 int 0x10inf_loop: jmp inf_loopmsg1: .byte 13,10 .ascii "Hello OS world, my name is LZJ" .byte 13,10,13,10.org 510boot_flag: .word 0xAA55
转载地址:http://kpzwi.baihongyu.com/
你可能感兴趣的文章
3.9.1 - Lists in Python
查看>>
3.9.2 - Lists - Adding and Removing Objects
查看>>
3.9.3 - Sorting Lists
查看>>
3.10 - Maya Commands: ls
查看>>
3.11 - Dictionaries in Python
查看>>
3.12 - Tuples in Python
查看>>
4.4 - For Loops
查看>>
4.2.2 - Logical and/or Operators
查看>>
Lesson 4 Part 2 Softmax Regression
查看>>
文章中运用到的数学公式
查看>>
Projective Dynamics: Fusing Constraint Projections for Fast Simulation
查看>>
从2D恢复出3D的数据
查看>>
glm 中 数据类型 与 原始数据(c++ 数组)之间的转换
查看>>
Derivatives of scalars, vector functions and matrices
查看>>
the jacobian matrix and the gradient matrix
查看>>
VS2010 将背景设为保护色
查看>>
ubutun里面用命令行安装软件
查看>>
ubuntu 常用命令
查看>>
SQLite Tutorial 4 : How to export SQLite file into CSV or Excel file
查看>>
how to move pivot to origin
查看>>